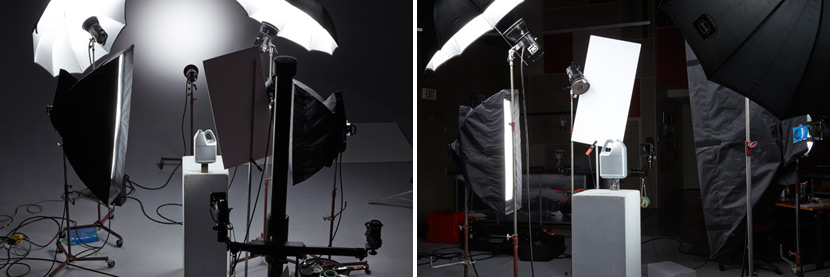
BP imaging‘s professional photographer John Majorossy recently had the task of photographing a bottle. It may sound quite simple but in reality there is much more than just picking up a camera and shooting. Many things need to be taken into consideration for a perfectly lit product photograph. As you can see in the picture above, the lighting arrangement has a great effect on the final image and can be quite complicated to understand. John decided to use five different lights and a bounce board in this photo shoot, each having a calculated purpose to exaggerate the features and bring out the beauty of the simple bottle. There are many different things to consider when deciding how to light your subject including the quality of light, position of light and angle of light.
Quality of Light
The quality of lighting, ranging from hard to soft, is a very important consideration in any type of photography. Adding contrast, brightness and shadows to create the correct mood, texture and depth. The photographer must be careful when dealing with the quality of light to keep the image and subject balanced.
Hard Lighting
Hard lighting is direct/unfiltered light that travels in an unobscured path to the subject and can create intense brightness thus creating high contrast and strong shadows. The highlights are much sharper compared to soft lighting and the photographer needs to be aware of the exposure, thus for shooting products soft lighting is preferred for an even source of light. An example of hard lighting is photographing on a bright and sunny day, the sun creates very bright areas and very dark areas. Professional photographers aim to use the lighting to optimize and balance the photograph.
Soft Lighting
Soft lighting is diffused/indirect light that travels in different directions and therefore provides an even source of lighting on the subject with less contrast between highlights and shadows. An example of soft lighting is photographing on a cloudy day where there are large shaded areas. The sunlight is diffused by the clouds creating even lighting, soft shadows and no bright spots. Flash diffusers and bounce boards can also be used to distribute the light evenly and create a softer light source rather than focused on one spot. The shadows are much more subtle and contrast is reduced making it the preferred option for shooting subjects where even lighting is required.
Position & Angle of Light Source
When deciding on the positioning and angle of the light source, the possibilities are endless spanning 360 degrees. More specifically in this shoot, John decided to use front, back and side lighting to light the product. Each light position has advantages and disadvantages, thus using multiple lights and positions can produce the optimal lighting situation for the photograph. This product photography shoot used multiple lighting positions to properly bring out the products highlights, shape and colour without any unwanted shadows.
Front Lighting
Front lighting is used to light the subject head on and creates a flat look with less shadows leading to a more predictable image with less emotion. Using front lighting alone in some cases can cause the image to be a bit boring because of the lack of depth, textures and volume. In this photo shoot front lighting was used to create balance and as a fill flash for additional light in darker spots created from the back and side lighting.
Back Lighting
Back lighting is as it sounds, when there is a light source placed behind the subject and in front of the camera. In this photo shoot John used a backlight to add separation between the product and background as well as balancing the colour/brightness of the photograph. When used alone, backlighting can cause a lack of detail in the dark areas of the subject. John chose to aim the light away from the product and camera to light up the background (studio wall) with a balanced intensity to highlight the edges of the bottle.
Side Lighting
Side lighting is also as it sounds, when positioning lights on the side of the product. This position of lighting creates a great deal of contrast while adding depth, texture, dimension and shape to the subject. The side lights make the shape of the bottle more pronounced and bring out the texture of the ridges on the bottle cap. As with using back lighting, side lighting can also be used to create separation from the background. But using side lighting alone in some cases can cause areas of the subject to become too dark and others too bright. This type of lighting is often used to emphasize emotion/mood and create a dramatic photograph, although mainly used with portrait photography.
Combining For The Final Photograph
In this photo shoot, John decided to combine various lighting positions (front/back/side lighting) to add highlights to the edges of the product and bring out the texture, shape and depth necessary. A bounce board was placed in front of the product to fill in any dark areas and add subtle lighting to the subject with stronger lighting being used from the side. This technique allows for more control of the brightness and an accurate presentation of the product colour. By combining various lighting types and positions, John was able to transform a simple bottle into something much more appealing for the client.
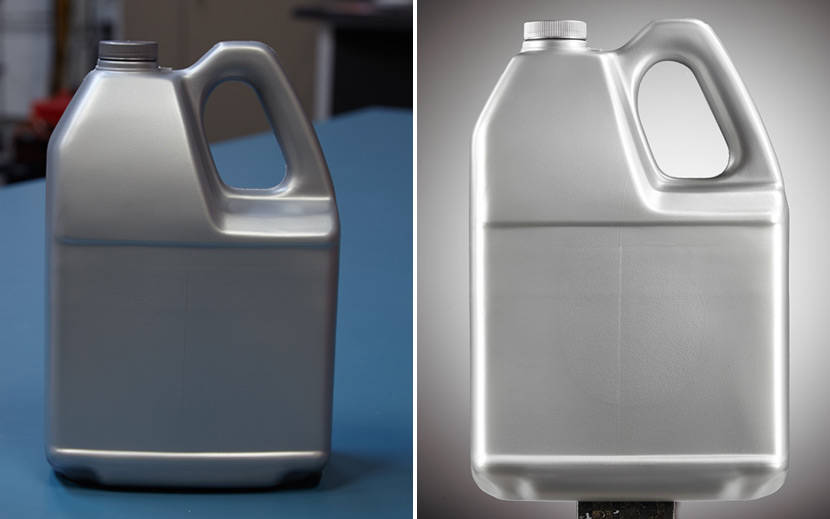
Below is a comparison using the available lighting in the studio versus using the professional photography lighting equipment. In the image on the right, John chose a lighting set up that allowed him to capture an image with more shape, texture, depth and accurate colour. All of which are by products of the basic considerations of photographic lighting including the quality, position and angle.
If you have read our past blog posts on lighting, you know there are many factors to consider in order to shoot a perfectly lit photograph. Add A Bit of Warmth To Your Photos outlines the benefits of colour correcting photography depending on the source of light being used. Creative Lighting Using Glass Blocks talks about using glass blocks to diffuse and modify the intensity of the light source for softer shadows in food photography. Finally, learn the advantages of using acrylic mirrors and plexiglass when photographing products or food to redirect light for a balanced photograph in A Game of Smoke and Mirrors.


